Want an activity that will appeal to all the Swifties in your classroom? Elementary school is the perfect time to nurture the inner artist that lives in every child, and the best way to encourage them to learn to draw is with something relatable. Our free printable has step-by-step instructions for teaching kids how to draw Taylor Swift. Make it a fun Friday group activity or keep it on hand for your fast finishers.
There’s a video tutorial and images with step-by-step instructions. Plus, be sure to download the free printable instructions so kids can easily follow along.
How To Draw Taylor Swift Video
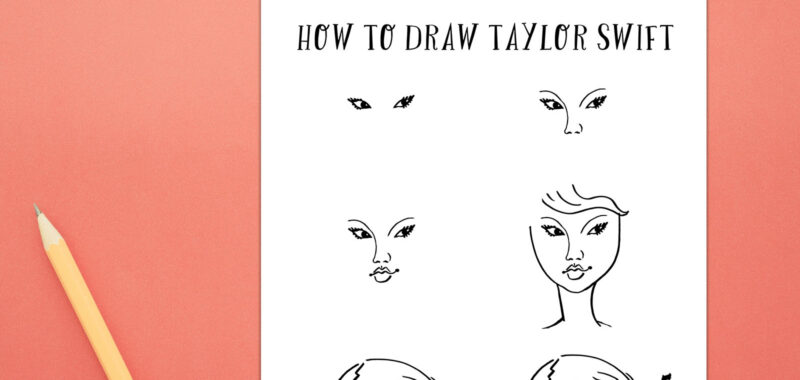
How To Draw Taylor Swift Step-by-Step
There are six easy-to-follow steps below for teaching kids how to draw Taylor Swift. They should simplify the process for kids of all ages and abilities.
Jen Kalis for We Are Teachers
Step 1
Before drawing, you’ll need a black marker and a white piece of paper. Start by drawing a small curved line toward the top of the paper. Draw another curved line beneath it so they form an almond-shaped eye that is slanted upward. Next, shade the upper half of the eye, leaving a white spec for the pupil. Finally, add eyelashes to the top and bottom of the eye. Repeat on the other side for the other eye, this time shading the bottom half of the eye.
Jen Kalis for We Are Teachers
Step 2
Now we’re going to add a nose and some eyebrows. Start your marker a little above the left eye and draw a curved line down a bit past the eye toward the middle of the page. This will serve as both the left eyebrow and the beginning of the nose. Add a little hook at the bottom of the nose. Next, add two nostrils and a small curved line to form the other side of the nose. Finally, add a curved line above the other eye that will be the right eyebrow.
Jen Kalis for We Are Teachers
Step 3
It’s time to give Taylor a mouth! Under the nose and in line with the inner corner of the eye, draw a curved line with two points that will serve as the center line of her mouth. Add a little dot at each of the corners of the line. Next, draw a shorter line that mirrors the center one above it. Add a very small vertical line between the top of the mouth and the bottom of the nose. Finally, add an upside-down half circle for the bottom of the mouth.
Jen Kalis for We Are Teachers
Step 4
Now that the features are drawn, it’s time to draw the face and neck shape. Start on the left side of the paper beside the eye and draw a curved line downward with a little curve under the mouth to form the chin. Place your marker on the other side of the paper beside the eye and draw a line that connects to the chin. Add a few wavy lines at the top of her head to form Taylor’s bangs. Finally, add two vertical lines coming off of the sides of the face to form the neck. Two little horizontal lines at the bottom of each of those vertical lines will serve as her collarbone.
Jen Kalis for We Are Teachers
Step 5
Let’s flush out those luscious locks now. The space between the top of the hair and the bottom of the bangs should be about half the width of the face. Starting at the top, in line with the outer edge of the left eye, draw a curved line. Then add a wavy line that falls just below Taylor’s collarbone. Add some texture throughout her hair by drawing small different-length wavy lines. The hair on the left side of her face should be closer to her head. Draw a lightning-bolt-looking line toward the top left of her hair to serve as the part.
Jen Kalis for We Are Teachers
Step 6
We’re almost done! Add a line at the bottom coming off of her left collarbone to act as the start of her shirt. Finally, add some musical notes around Taylor’s head. Draw a small circle with a line coming off of it with a little flag at the top. You can use creative license to change up the types of notes.
Get your free printable!
Jen Kalis for We Are Teachers
Are you ready to save and print your free Taylor Swift–drawing printable? All you need to do is click the button below to fill out the form at the top of this page.
Do you have more ideas for art activities? Come and share them in our We Are Teachers HELPLINE group on Facebook.
Plus, check out more of our favorite Directed Drawing Activities for Kids.
Sheryl Carpente's biographical information can be found on the Stella Maris Press site. She is a news writer for arts, construction, automotive, travel and real estate, as well as fashion. Her hobbies include reading and traveling.